24 Jul 2013
|
Xamarin
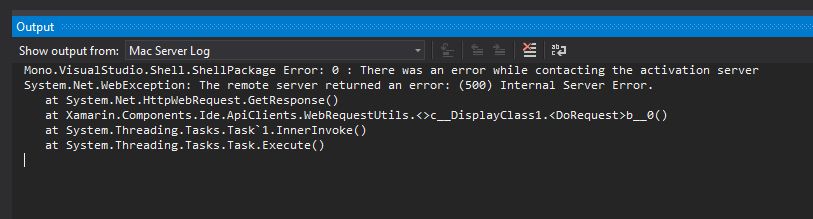
I've been having Activation Issues with the Xamarin products numeral times now, although it has become better over time. Today it seems like Xamarin is having issues with their servers. My Xamarin products worked well yesterday. Now when I try to start VS and open up a Xamarin project it tries to call home to Xamarin and Activate my product... Why is it necessary to call home every time I open up a Xamarin project?
Below you see a screenshot of the log, telling me that there is an Internal Server Error when contacting Xamarin Activation Server.
And here is a screenshot of their store page, which just dumps source code.
Why is it that when Xamarin has problem with their servers, I have to stop developing my products and wait till they fix that?
To your information I am running the latest Xamarin Alphas where it is said that these issues should be fixed and should not require Internet connection once activated. I see something different.
Xamarin, please fix these issues. I love your products, except your Activation :(
22 Jul 2013
|
Xamarin.iOS
MvvmCross
Usually when creating bootstrap files to load Plugins in Mvx, you just write something in the lines of
However this does not work with iOS, because it is not as cool as WP8 and Android, as it does not use cool JIT compilation. Hence, in order to get Plugin Bootstrapping to work you have to use MvxLoaderPluginBootstrapAction instead to tell iOS AOT compiler a bit more about this Plugin.
This way you avoid a nasty MvxException telling you that there is no Plugin registered for a specific type.
Silly iOS...
17 Jul 2013
|
Maps
Xamarin.Android
I spent a lot of time yesterday debugging why BitmapDescriptorFactory was throwing a null pointer exception all the time. After a while I realised it was only when I was using a Drawable I had created using XML, more specifically a layer-list with a shape and an item which has a Drawable. This should show up as a slightly translucent circle with an image on top, and works very fine when using it as a source for an ImageView. However, when trying to use it as Icon for a Marker with the new Google Maps v2 API, it just throws a null pointer exception, without much reason why :-(
So from here I have two choices, either create an image with the desired marker, or draw it programatically on a Bitmap Canvas. The first one is easy enough and I will not show that here, it is just a simple image you pop into the drawable folders in your Android project. The latter is way more fun and could be useful to you. The sample will be using Xamarin.Android to demonstrate how it is done there, however, it may be applicable to Java Android.
So first you need to know how big you want to have the marker to be.
In this case I just set it to 60dp, you can experiment with that. Now you have to do the drawing action.
Now that you have your BitmapDescriptor you can set it as an Icon for the map Marker.
There, done!
15 Jul 2013
|
MvvmCross
Xamarin.Android
I've been toying around with MvvmCross (Mvx) and Fragments lately and found out that my binding for the ViewPager is only working if you are using old type of Activities and Views. So in this blog post I will describe what I did to get the ViewPager to work nicely with Fragments and Mvx.
I have made some code samples which are shown in the bottom of this blog post and which I will refer to. So to start with, let me explain why this approach is necessary. There are currently no official bindings for the ViewPager for Mvx for Xamarin.Android. However, I did make one, and it works pretty well and binds to the ViewPager like you would with a ListView. In fact you can use different ItemTemplates such that you can display different kinds of Views inside the ViewPager. How to do that is decribed in the Working with Collections Tutorial in the MvvmCross Tutorials repository.
With Fragments that approach changes. Now a FragmentPagerAdapter is required, which creates instances of Fragments and keeps track of which are shown on the screen and which to cache, much in the same fashion as a normal Adapter for ListViews. However Fragments are a lot different as they have their own life-cycle and with Mvx each of them have their own ViewModel as well, just like you previously would have a ViewModel for an Activity. The binding of the View associated to a Fragment also happens inside that Fragment. So the binding action which previously was inside the Adapter, now is handled in the Fragment. This means a lot less work for me! So since I cannot use the bindings I previously made I had to come up with something new.
Anyways let us get to the fun stuff and let me explain the code below.
- Home.axml is the Android View, which contains the ViewPager and an optional ViewPagerIndicator (will post source for this soon, look out for another blog post meanwhile you can use this) - very simple no bindings here.
- HomeViewModel.cs is a simple ViewModel, similar to one you would use for a Tab kind of View, which instantiates other ViewModels to use for each tab, or in this case for each page in the ViewPager.
- MvxViewPagerFragmentAdapter.cs is what we need to inform ViewPager about our Fragments. It needs to know about at least the Type of the Fragment and the ViewModel associated to it. The Title is just for convenience when using a ViewPagerIndicator. Basically what happens in GetItem is that a Fragment of a specific Type gets instantiated and the DataContext for that Fragment is set. This way the Fragment itself can create bindings to Properties and Commands internally. GetPageTitleFormatted is simple for a ViewPagerIndicator. FragmentJavaName and FragmentInfo was highly inspired by the MvxTabsFragmentActivity which kind of does the same thing as this Adapter but with a lot more stuff to make it work with a TabHost.
- HomeView.cs now this last piece of code, simply creates the FragmentInfo instances for the Fragments I want to display in the ViewPager and gives that information to the Adapter which is set for the ViewPager.
This is basically it. See the video for a quick run through of the code and how it looks at the end of it.
03 Jul 2013
|
Xamarin.Android
Recently Xamarin released version 4.7.10 alpha of Xamarin.Android, which stated:
"PCL support!
(Cross your fingers, sacrifice your favorite meal under the full moon, and your PCL projects should Just Work! Testing wanted.)"
So I kind of wanted to find out if it really was true, and it also happens to be that I am doing a project which needs to fetch something from the Internet, which is great to test out HttpClient in PCL's as well. The project also uses Stuart Lodge's fantastic MvvmCross framework, also with the new PCL stuff, and everything seems to work. However there are some things you have to work around until Xamarin releases tooling that allows you to reference PCL's in your Android and iOS projects in the Visual Studio plugin.
So what I have tried:
- Download MvvmCross from the GitHub Repo, and rebuild the whole thing with the new Xamarin.Android version.
- Create a new PCL Library project in either Xamarin Studio or Visual Studio. I choose to target WP8, Store apps and .NET 4.5.
- Grabbed prerelease Microsoft.Net.Http package for the PCL. This also imports some Bcl stuff which allows you to use Async in the PCL. Now you should be able to use HttpClient and Async, sweet!
- For the Android project, here what is tricky. VS will complain that the Android project does not support PCL's, but it is lying! What you can do is either manually add a reference in the .csproj file or open up the project in Xamarin Studio and do it there.
- You will also have to grab the DLL's from the packages folder in your solution and import System.Net.Http, System.Net.Http.Extensions and System.Net.Http.Primitives from the Microsoft.Net.Http NuGet package you downloaded. I took if from the portable-net40+sl4+win8+wp71 folder.
- Now do your MvvmCross stuff, I just bound a button to a Command in my ViewModel, which calls a method in a service, which then in turn uses HttpClient to fetch some stuff from a Web Service.
This should also work for Xamarin.iOS and also on WP7 and WP8, Store Apps etc. As long as you use Microsofts BCL and Http packages in your projects.
Made a video describing the whole thing in more details:
Sample code can be found in my GitHub repo