
Using Dialogs in Mono for Android
23 Feb 2013 | Xamarin.Android- Showing Alerts - The user gets notified about something important happening in the application, or the application failed. You might know the Alert Dialog, which shows when an application becomes unresponsive and you get the choice to either Wait or Force Close the application.
- Selecting a values from lists - The user chooses a field and gets presented with a short list of choices. This could be for instance that you are already showing another dialog, where you want the user to write his username and password, but additionally you want the user to choose a server from a list of the available ones, this could get presented in a new dialog.
- Adjusting settings - For instance when you have to adjust the brightness of your screen on your phone, you are shown a dialog with sliders for adjusting the brightness. This is also the case for volume etc.
- Picking a Date or Time - This is used widely in Alarm clock and calendar applications.
There are probably many more uses, but I think you get the idea about the use of Dialogs and what they are good for. If you notice the pattern, Dialogs are made for making the user take an action. What are Dialogs less good for? I highly recommend not using them for progress indications. Taking away the focus from the app to show a Dialog with a Progress Indicator is not good use, you should rather, if possible, show a ProgressBar or Activity Indicator in your view, and let your user navigate around your application, to be able to do something else in your application while they wait for the other task to end. This could be uploading a file to a server, people do not want to wait and watch a ProgressBar in a Dialog and not being able to do anything else, they will get bored quickly.
Before we get our hands dirty in code let me explain the two methods to create Dialogs. One is you create it inline of the code where you need to show it. That could be in an EventHandler for a Button. Another way is to use the OnCreateDialog methods in an Activity, however note that these were Deprecated in API level 8 and 13 when Fragments were introduced. The instantiation of a Dialog has not changed. It is recommended to use a DialogFragment in API level 13 and above which I will cover at a later point in this blog post.
Dialogs in Activities
Get the sample code here!
Now that is covered why don't we get our hands a bit dirty with some code samples? The first couple of samples are going to show what the default Dialog classes can show without using custom views inside, then some more advanced stuff will be shown. Also the first samples will use the old style of creating Dialogs inside activities, and the last samples will show the DialogFragment introduced in API level 13.
Now that is covered why don't we get our hands a bit dirty with some code samples? The first couple of samples are going to show what the default Dialog classes can show without using custom views inside, then some more advanced stuff will be shown. Also the first samples will use the old style of creating Dialogs inside activities, and the last samples will show the DialogFragment introduced in API level 13.
This first sample shows how to create a simple Yes/No type of dialog, which shows when a user presses a button. I use an AlertDialog.Builder to create this dialog, and you will see this approach used throughout the samples. An AlertDialog has loads of properties which can be set, such as the title, messsage, negative button and positive button. Here a message is set, the negative and positive buttons. The EventHandlers are empty in this sample, but could be used to do an action in your application. When using AlertDialog.Builder you need to call Create() at the end to get the actual AlertDialog instance, which then can be shown by calling Show(). The resulting dialog can be seen in Figure 1.
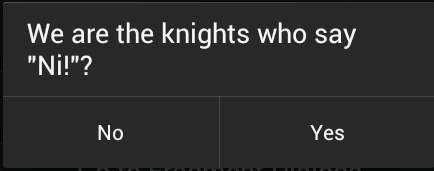 |
| Figure 1 - Simple Yes / No Dialog |
Now lets look at how to create an Alert type of Dialog, screenshot can be seen in Figure 2, with an icon and title and a couple of buttons. Notice how this time I am calling ShowDialog inside the Click Event and how I have consts defined in the top of my class. This is due to the int id which is passed in ShowDialog is the same id which is passed as argument in OnCreateDialog where I create my dialogs, which is the pattern used pre API level 13.
This kind of Alert Dialog can of course also have some description text which is simply set with the SetMessage() method.
This kind of Alert Dialog can of course also have some description text which is simply set with the SetMessage() method.
 |
| Figure 2 - Alert Dialog |
Now let us try something more exciting. Let us make a dialog with an item you can select from a list.
The AlertDialog class has a nice method SetSingleChoiceItems which takes a list of items either from Arrays.xml or a an array of items. You also need to provide it with an EventHandler for what happens when an Item in the list is selected. Otherwise it is the same approach as the other two Dialogs shown. Instead of using lambda expressions for the Event Handlers for the positive and negative buttons you can also make methods for handling the events. The result of this dialog can be seen in Figure 3.
 |
| Figure 3 - List Dialog |
AlertDialog also has a nice method for making Multiple Choice Dialogs, so it shows a list of items which have checkboxes. This is done by giving the method SetMultiChoiceItems an array of items either from Resource or an instance, you can choose which items are checked or not and lastly add an Event Handler for handling which items are chosen.
 |
| Figure 4 - Multi Choice List Dialog |
Final example shows how to make a Dialog with a custom view inside of it. Approach is exactly the same as with the other examples, however this time I use the SetView() method of AlertDialog to set the custom view, which I have inflated. The OnClicked handler also shows you how to get the data from the elements in custom view.
 |
| Figure 5 - Custom View Dialog |
Dialogs in Fragments
You might think that this is all to know about Dialogs, but sorry there are still some stuff to cover. I've pointed out that some methods were deprecated in API level 8 and 13, and a new pattern was introduced around that time called Fragments. Creating Dialogs in Fragments is slightly different that in Activities; hence I will show you two examples on how that is done. However creating the actual Dialog is still done with AlertDialog, but I will also show you one of the built in Dialogs in Android.Lets just dive into the code!
This is a very simple dialog inflating a view with a couple of buttons. Their Click events are set to instantiate a some dialogs, which are not shown. But this approach is the way you show Dialogs when using Fragments. Actually you are displaying DialogFragments. It also implements a couple of listeners for the two different Dialogs which I will show you now.
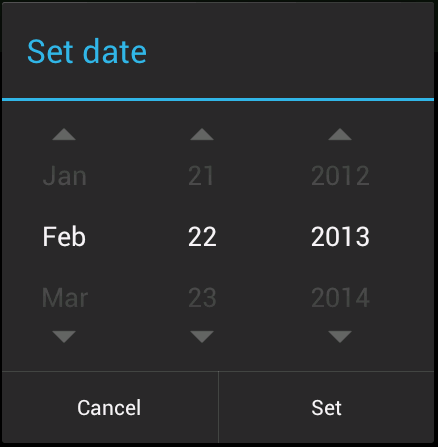 |
| Figure 6 - DatePickerDialogFragment |
Just to show another example, let us create a Custom View DialogFragment, which allows you to pick a number from a NumberPicker, see Figure 7.
 |
| Figure 7 - NumberPickerDialogFragment |
Now you have seen a lot of different Dialogs, both using the old deprecated Activity approach and the newer Fragment approach. The entire sample can be seen in my GitHub repository for this blog post.