Using SafetyNet API in Xamarin.Android
19 Aug 2021 | Xamarin Xamarin.Android dotnetAll the code in this post can be found on GitHub
A StackOverflow question sparked my interest in playing around with the SafetyNet API on Android.
You might ask, what is this SafetyNet thing? Let us say you are writing an Application, where trust and security is a top concern. You want to verify that the device your App is running on has not been tampered with. It will check both the hardware and the software to see what the condition it is in. Google provides SafetyNet to help with detecting this. It is not bulletproof and there are ways of circumventing this. So it should be kept in mind that it should not be used as the only way to detect and prevent any abuse. There is some very good documentation with a lot more details you can read in the Android Developer docs.
The SafetyNet API can be queried through Google Play Services libraries that you add to your App. This means, the device you are running on will need to have a recent enough version of Google Play Services as well. Devices without Google Play Services, will not be able to pass this check, as such devices are usually not certified by Google.
You will need to add the following NuGet package:
Xamarin.GooglePlayServices.SafetyNet
This package has a ton of dependencies that it pulls in. Additionally if you want to check the response from the API you might also want to install:
System.IdentityModel.Tokens.Jwt
The response is a JWT token that you can verify and its claims will contain the result of the attestation.
Checking for Google Play Serivces
Before you can do anything, you need to check if the Device has Google Play Services installed. This is fairly simple and Google provides an easy way to do this through the Play Service libraries that are pulled in as dependencies.
var code = GoogleApiAvailability.Instance.IsGooglePlayServicesAvailable(context, 13000000);
The code returned he can be checked for whether the services are available, if not it can also be used to show a message to the user of what they can do to resolve the issue, this can be done like so:
if (code == ConnectionResult.Success)
   // bingo!
If we have an error showing a message to the user can be done with:
var instance = GoogleApiAvailability.Instance;
if (instance.IsUserResolvableError(errorCode))
{
    instance.ShowErrorDialogFragment(context, errorCode, 4242);
}
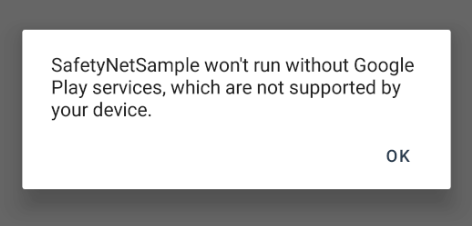
This should show a dialog looking like so. But it varies depending on the error:
Once you’ve checked and verified Google Play Services are available, you can then start checking the SafetyNet attestation.
Acquiring an SafetyNet API key
In your Google Cloud Console you will need to enable the Android Device Verification service.
Once you have enabled it, you will be prompted to create an API key. I highly suggest that you create it where you tie it to the application identifier, such that it is only usable by the App. You can create another API key for your validation server. Once you have an API key you are ready to verify your device.
Checking SafetyNet Attestation
With a API key in your hand and Google Play Services ready and installed, you can now use the SafetyNet client to acquire an attestation.
SafetyNetClient client = SafetyNetClass.GetClient(context);
var nonce = Nonce.Generate(24);

var response = await client.AttestAsync(nonce, attestationApiKey).ConfigureAwait(false);
The nonce here is very important, the more information it contains, the harder it will be for attackers to make replay attacks on your App. Google recommends you add stuff like:
- hash of username
- timestamp of the nonce
The example of
nonceabove is not recommended to use
With the response in your hand, you can already decode it as a JWT token to figure out what SafetyNet thinks about the device:
var result = response.JwsResult;
var jwtToken = new JwtSecurityToken(result);

var cts = jwtToken.Claims.First(claim => claim.Type == "ctsProfileMatch").Value;
var basicIntegrity = jwtToken.Claims.First(claim => claim.Type == "ctsProfileMatch").Value;
The ctsProfileMatch is a verdict of the device integrity. This will be true if your device matches a profile of a Google-certified Android device.
While, the basicIntegrity is more lenient and is telling you whether the device the App is running on has been tampered with.
There is a table in the Android documentation which tells what it means if these values are true or false.
Note emulators will always return false for both values
Ideally, you would send this JWT token to be verified on your server to check if the nonce matches and the signatures are valid. Your server would either call Google’s API to validate the JWT token. Which can be done as follows.
public async Task<bool> VerifyAttestationOnline(string attestation)
{
    using var request = new HttpRequestMessage(HttpMethod.Post,
        $"https://www.googleapis.com/androidcheck/v1/attestations/verify?key={attestationApiKey}");
    var data = new JWSRequest { SignedAttestation = attestation };
    var json = JsonSerializer.Serialize(data);
    request.Content = new StringContent(json, Encoding.UTF8, "application/json");

    using var response = await httpClient.SendAsync(request).ConfigureAwait(false);
    response.EnsureSuccessStatusCode();

    using var responseData = await response.Content.ReadAsStreamAsync().ConfigureAwait(false);
    var attestationResponse = await JsonSerializer.DeserializeAsync<AttestationResponse>(responseData).ConfigureAwait(false);

    return attestationResponse.IsValidSignature;
}

public class JWSRequest
{
    [JsonPropertyName("signedAttestation")]
    public string SignedAttestation { get; set; }
}

public class AttestationResponse
{
    [JsonPropertyName("isValidSignature")]
    public bool IsValidSignature { get; set; }
}
Alternatively Google provides a sample to validate the JWT token yourself offline.
Make sure you go through [this checklist] before you ship your SafetyNet validation to make sure you have covered all cases.
All the code can be found in a Sample Application I have made and published on GitHub.


