Using Charles Proxy with Xamarin.Android

|

I’ve been debugging some network issues in one of my Apps recently. To help me I acquired the help of the excellent macOS Application Charles Proxy. I needed to see what was sent to and from the servers the App communicates with and also check the contents. One issue though, all the calls are through SSL, so without a little bit of setup, you will not get far checking the contents of the calls.

The information served in this blog post, may also work with Fiddler and mitm-proxy if you prefer those tools.

Charles Proxy has a way to do SSL proxying, which can show you the text contents of SSL requests and responses. You can specify specific sites to include. To get this to work with Xamarin.Android or .NET6 Android, we need to tell the AndroidClientHandler which certificates we trust. In addition to the regular set up specifying Charles to be the proxy in the WiFi Settings.

For some reason using the built in Android functionality specific to setting networkSecurityConfig in the Android manifest and allowing to use trusted user certificates doesn’t work with AndroidClientHandler, so we have to do some manual grunt work.

1. Setting Up Device Proxy

First we need to modify the device settings to point towards Charles Proxy. You can do that through WiFi settings on your device. Go to Settings -> Network & Internet -> Wi-Fi. Press the Gear icon next to the connected network and edit it using the pencil icon.

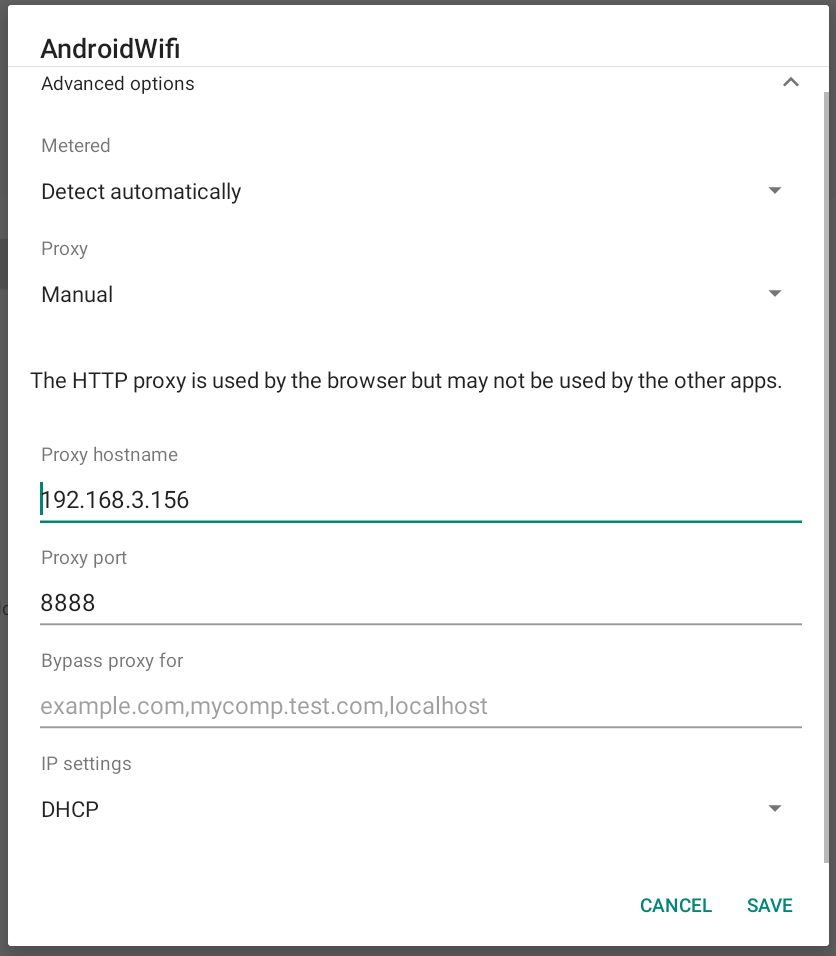
In the Proxy drop down select Manual

Proxy hostname will be the IP of the machine you are running Charles Proxy on. You can find this using Charles in the Help -> Local IP address menu. Proxy port will be the port defined in Charles Proxy settings, default is 8888

Screenshot of Proxy Setup for Charles

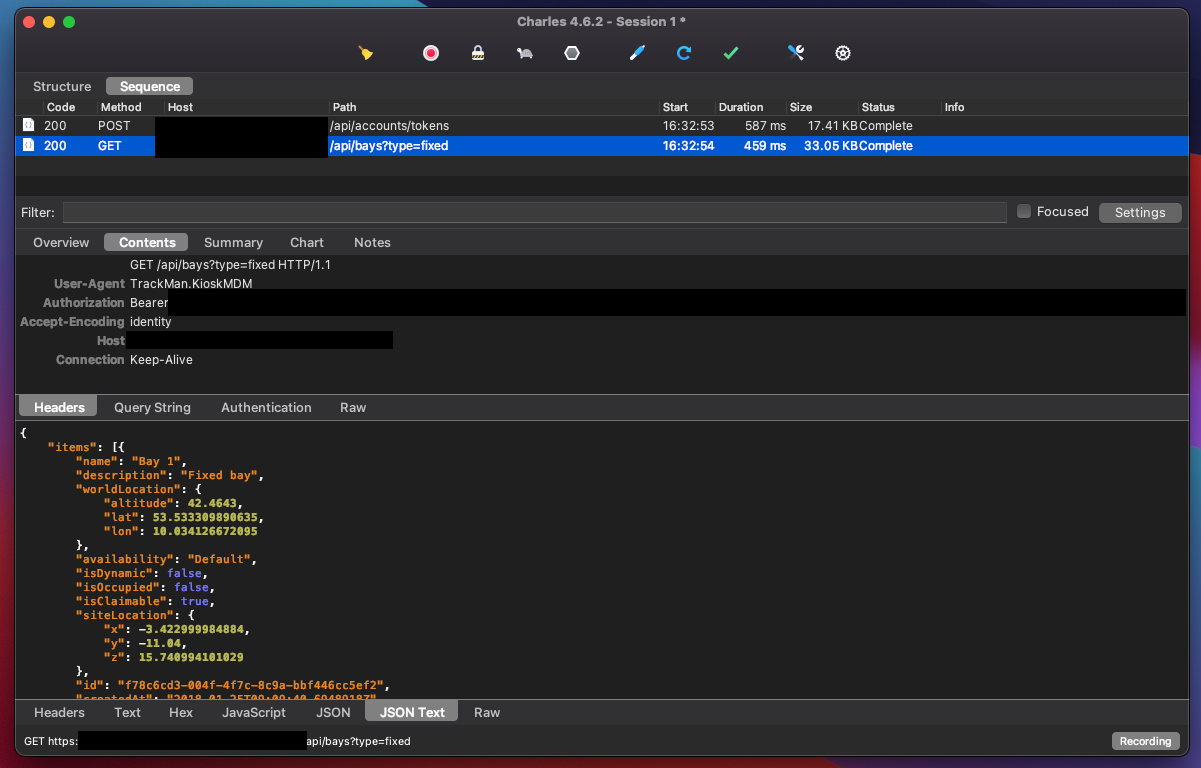
Doing this step, you should start seeing traffic flowing into Charles from your device. You will see that all SSL requests/responses have garbled data. Not something you can read. We will fix that in next step.

You can also verify the proxy works by going to http://chls.pro/ssl in a browser on the device, and it will download the Charles Root Certificate. For this setup, it is optional to install it.

2. Adding Trusted Certificates to AndroidClientHandler

Since AndroidClientHandler doesn’t grab user installed certificates, we need to add them ourselves.

In Charles Proxy go to Help -> SSL Proxying -> Save Charles Root Certificate…. Save it as Binary certificate (.cer).

In your Android project add it to the Assets folder and remember to mark the file Build Action as AndroidAsset.

Now to setting up a AndroidClientHandler with the certificate.

private AndroidClientHandler CreateClientHandler()
{
    CertificateFactory? factory = CertificateFactory.GetInstance("X.509");
    var clientHandler = new AndroidClientHandler();
    if (factory == null)
        return clientHandler;

    try
    {
        using Stream? stream = ApplicationContext?.Assets?.Open("charles-ssl-proxying.cer");
        var cert = (X509Certificate?)factory.GenerateCertificate(stream);

        if (cert != null)
        {
            clientHandler.TrustedCerts ??= new List<Certificate>();
            clientHandler.TrustedCerts.Add(cert);
        }

        return clientHandler;
    }
    catch (Exception e)
    {
        _logger.LogError(e, "Failed to get Charles Certificate");
        throw;
    }
}

Basically what happens here is that we load the charles-ssl-proxying certificate from assets and create a certificate that we add to AndroidClientHandler.TrustedCerts. This is where it expects extra certificates to be added.

Now with this AndroidClientHandler you can create your HttpClient with that handler:

var client = new HttpClient(CreateClientHandler());

In my latest project I started using HttpClientFactory, which allows me to set this handler once and forget about it.

Anyways, when creating requests with HttpClient now, you should be albe to see the data sent and received even when using SSL!

Note: remember to add domains to the SSL Proxy Settings in Proxy -> SSL Proxy Settings in Charles. A good practice is to limit these to the domains you expect and want to debug.

Screenshot of Charles SSL Proxy

Using SafetyNet API in Xamarin.Android

|

All the code in this post can be found on GitHub

A StackOverflow question sparked my interest in playing around with the SafetyNet API on Android.

You might ask, what is this SafetyNet thing? Let us say you are writing an Application, where trust and security is a top concern. You want to verify that the device your App is running on has not been tampered with. It will check both the hardware and the software to see what the condition it is in. Google provides SafetyNet to help with detecting this. It is not bulletproof and there are ways of circumventing this. So it should be kept in mind that it should not be used as the only way to detect and prevent any abuse. There is some very good documentation with a lot more details you can read in the Android Developer docs.

The SafetyNet API can be queried through Google Play Services libraries that you add to your App. This means, the device you are running on will need to have a recent enough version of Google Play Services as well. Devices without Google Play Services, will not be able to pass this check, as such devices are usually not certified by Google.

You will need to add the following NuGet package:

Xamarin.GooglePlayServices.SafetyNet

This package has a ton of dependencies that it pulls in. Additionally if you want to check the response from the API you might also want to install:

System.IdentityModel.Tokens.Jwt

The response is a JWT token that you can verify and its claims will contain the result of the attestation.

Checking for Google Play Serivces

Before you can do anything, you need to check if the Device has Google Play Services installed. This is fairly simple and Google provides an easy way to do this through the Play Service libraries that are pulled in as dependencies.

var code = GoogleApiAvailability.Instance.IsGooglePlayServicesAvailable(context, 13000000);

The code returned he can be checked for whether the services are available, if not it can also be used to show a message to the user of what they can do to resolve the issue, this can be done like so:

if (code == ConnectionResult.Success)
   // bingo!

If we have an error showing a message to the user can be done with:

var instance = GoogleApiAvailability.Instance;
if (instance.IsUserResolvableError(errorCode))
{
    instance.ShowErrorDialogFragment(context, errorCode, 4242);
}

This should show a dialog looking like so. But it varies depending on the error:

Screenshot of Save dialog showing error about Google Play Services missing on device

Once you’ve checked and verified Google Play Services are available, you can then start checking the SafetyNet attestation.

Acquiring an SafetyNet API key

In your Google Cloud Console you will need to enable the Android Device Verification service.

Screenshot of Google Cloud Console Android Device Verification search in Marketplace

Once you have enabled it, you will be prompted to create an API key. I highly suggest that you create it where you tie it to the application identifier, such that it is only usable by the App. You can create another API key for your validation server. Once you have an API key you are ready to verify your device.

Checking SafetyNet Attestation

With a API key in your hand and Google Play Services ready and installed, you can now use the SafetyNet client to acquire an attestation.

SafetyNetClient client = SafetyNetClass.GetClient(context);
var nonce = Nonce.Generate(24);

var response = await client.AttestAsync(nonce, attestationApiKey).ConfigureAwait(false);

The nonce here is very important, the more information it contains, the harder it will be for attackers to make replay attacks on your App. Google recommends you add stuff like:

  • hash of username
  • timestamp of the nonce

The example of nonce above is not recommended to use

With the response in your hand, you can already decode it as a JWT token to figure out what SafetyNet thinks about the device:

var result = response.JwsResult;
var jwtToken = new JwtSecurityToken(result);

var cts = jwtToken.Claims.First(claim => claim.Type == "ctsProfileMatch").Value;
var basicIntegrity = jwtToken.Claims.First(claim => claim.Type == "ctsProfileMatch").Value;

The ctsProfileMatch is a verdict of the device integrity. This will be true if your device matches a profile of a Google-certified Android device. While, the basicIntegrity is more lenient and is telling you whether the device the App is running on has been tampered with.

There is a table in the Android documentation which tells what it means if these values are true or false.

Note emulators will always return false for both values

Ideally, you would send this JWT token to be verified on your server to check if the nonce matches and the signatures are valid. Your server would either call Google’s API to validate the JWT token. Which can be done as follows.

public async Task<bool> VerifyAttestationOnline(string attestation)
{
    using var request = new HttpRequestMessage(HttpMethod.Post,
        $"https://www.googleapis.com/androidcheck/v1/attestations/verify?key={attestationApiKey}");
    var data = new JWSRequest { SignedAttestation = attestation };
    var json = JsonSerializer.Serialize(data);
    request.Content = new StringContent(json, Encoding.UTF8, "application/json");

    using var response = await httpClient.SendAsync(request).ConfigureAwait(false);
    response.EnsureSuccessStatusCode();

    using var responseData = await response.Content.ReadAsStreamAsync().ConfigureAwait(false);
    var attestationResponse = await JsonSerializer.DeserializeAsync<AttestationResponse>(responseData).ConfigureAwait(false);

    return attestationResponse.IsValidSignature;
}

public class JWSRequest
{
    [JsonPropertyName("signedAttestation")]
    public string SignedAttestation { get; set; }
}

public class AttestationResponse
{
    [JsonPropertyName("isValidSignature")]
    public bool IsValidSignature { get; set; }
}

Alternatively Google provides a sample to validate the JWT token yourself offline.

Make sure you go through [this checklist] before you ship your SafetyNet validation to make sure you have covered all cases.

All the code can be found in a Sample Application I have made and published on GitHub.

Universal AppLinks on iOS

|

I was lucky to be tasked to get Universal AppLinks working, for a cool feature in the TrackMan Golf App I work on at work. I thought this would be super easy to do. But, oh how naive and wrong I was.

So in essence, the App is supposed to open if I hit a URL with a specific pattern for one of our domains. Something like: https://trackman.com/pin/123456. Where the numbers can differ.

I’ve done this before with a custom scheme like trackman://pin/123456, which is just a simple entry in the Info.plist for your App. However, for Universal AppLinks, there are many more moving parts involved.

1. Associate your App(s) to a specific domain

I guess, in order to not be able to open arbitrary URLs in your App. Apple, requires you to host a file called apple-app-site-association on your Web Server. This file should not have any file extensions. Make sure you also serve it with the Content-Type: application/json. Also, there should be no redirects to get to this URL.

This file should be in either the root or in a .well-known folder. For instance:

  • https://trackman.com/apple-app-site-association
  • https://trackman.com/.well-known/apple-app-site-association

Apple will check the .well-known folder first, then fall back to the root.

This check happens when you install the App on your device. There is a process called swcd that will run and check these associasions on your device during install. If any of this stuff fails, this swcd process is what you look for in the device log. The errors will look something like this.

Request for '<private>' for task AASA-80AD262A-3EF6-42A2-B992-AC97234187647 { domain: *.tr....com, bytes: 0, route: cdn } denied because the CDN told us to stop with HTTP Status...

You will need to deduct yourself which domain it relates to, because the console entries redact some of the values. However, it will tell you what is wrong. Some common issues are:

  • SSL certificate doesn’t match the domain entry you’ve registered
  • Apple CDN cannot access the file
  • The JSON is in a wrong format

Yes, you read it right. From iOS 14 and up, Apple will hit the file through their CDN. So you have to make sure their CDN can reach the file.

The contents of this JSON file will look as follows. Also refer to Listing 6-1 in these Apple docs. for more details of the format.

{
    "applinks": {
        "apps": [],
        "details": [
            {
                "appID": "<app id prefix>.<bundle id>",
                "paths": [ "/pin/*"]
            }
        ]
    }
}

The JSON file format that they suggest in the Supporting Associated Domains documentation, did not work for me! If something doesn’t work, try swiching between the two. Unfortunately Apple does not provide a JSON-Schema for this, so it is not easy to validate if you entered stuff correctly, except that you are returning valid JSON.

The App id prefix and bundle name can be located in the developer portal where you have created your App in the Identifiers section. The App Id will be the same as your Team ID usually. Bundle id, is the Id of your App that you have registered in there. So appID that goes into the JSON file will look something like: 2V9BB354QZ.my.awesome.app.

The paths is an array of paths. So anything that goes after your domain. You can use wildcards like:

  • * will match any substring
  • ? will match a single character

Examples:

  • /tamarin will match a specific path
  • /cats/* will match everything in the “cats” section of your website
  • /cats/archives/202? will match everything in “cats/archives” and 2020-2029

You can combine the wildcard characters. The paths array can have multiple, comma delmited paths for a App Id.

To exclude a path you can write NOT /cats/*.

2. Enabling the Associated Domain entitlement in provisioning profiles

Go to Certificates, Identifiers & Profiles in the Apple Developer Portal. Here you will need to enable the “Associated Domains” entitlement for your App.

In the list of Identifiers find your App and Edit it. Enable the “Associated Domains” entitlement Screenshot of Associated Domains option in Developer Portal

Now go to any Provisioning profiles you have an regenerate them. You might be using Fastlane or something like that. Read the docs for your tool to download or regnerate provisioning profiles.

After regenerating the Provisioning profiles, you might need to update any CI pipeline and machines that you build on with these new profiles.

3. Adding Associated Domains to your Entitlements.plist files

If you don’t have a Entitlements.plist file, it is now time to create one. Microsoft provides good docs for you to read more about how to create one. You will need to add all the domains you wish your Apps to open. These of course need to match the domains you added in the first step in the apple-app-site-association file. This will look something like:

<key>com.apple.developer.associated-domains</key>
<array>
    <string>applinks:trackman.com</string>
    <string>applinks:ostebaronen.dk</string>
    <string>applinks:sub-domain.ostebaronen.dk</string>
</array>

You can also use wildcards here:

<string>applinks:*.ostebaronen.dk</string>

This will match any sub-domain, but not include the raw ostebaronen.dk domain. If you can avoid it, I recommend not to use the wildcard here. I had issues with the Apple CDN not being able to process the apple-app-site-association file, since it seems like it expects a wildcard entry in the SSL certificate too. I did not have that. If you are going to use it, make sure to test this thoroughly.

4. Extending AppDelegate.cs to handle the URL requests to your App

Luckily it seems like how our App is triggered is that first it launches the App fully. So FinishedLaunching is allowed to complete. Then ContinueUserActivity gets triggered with the URL. For good measures I also added an override for UserActivityUpdated. So in your AppDelegate.cs override these two methods.

public override bool ContinueUserActivity(UIApplication application, NSUserActivity userActivity, UIApplicationRestorationHandler completionHandler)
{
    CheckForAppLink(userActivity);
    return true;
}

public override void UserActivityUpdated(UIApplication application, NSUserActivity userActivity)
{
    CheckForAppLink(userActivity);
}

To get the URL from the NSUserActivity I got inspired from the AppDelegate.cs that Xamarin.Forms provides.

The code looks like:

private void CheckForAppLink(NSUserActivity userActivity)
{
    var strLink = string.Empty;
    if (userActivity.ActivityType == "NSUserActivityTypeBrowsingWeb")
    { 
        strLink = userActivity.WebPageUrl.AbsoluteString;
                
    }
    else if (userActivity.UserInfo.ContainsKey(new NSString("link")))
    {
        strLink = userActivity.UserInfo[new NSString("link")].ToString();
    }

    // do something clever with your URL here
    NavigateToUrl(strLink);
}

5. Debugging all of this

This part is a huge pain. First of all, it appears to me, when you deploy an Application using Xcode or Visual Studio, the swcd process doesn’t run and check the apple-app-site-association file. This means when you hit your URL in Safari or through a QR code, it will not suggest to open your App. I had to grab builds from my CI pipeline for this to work 😢.

But things to check:

  • apple-app-site-association is reachable
  • the URL you are hitting is not returning 404 (although it might actually still work)
  • entries in your Entitlements.plist match the association json file
  • if you have multiple Entitlements for different configurations, make sure you are using the correct one
  • check the console output on your device
    • Xcode -> Window -> Devices & Simulators -> Devices -> Select device -> Open Console
    • Click Errors and Faults
    • add swcd in the search field

6. Bonus: Handling custom schemes

If you also need to handle custom URL schemes. The only thing you need to do is to register the schemes in your Info.plist file:

<key>CFBundleURLTypes</key>
<array>
    <dict>
        <key>CFBundleURLName</key>
        <string>my.bundle.id</string>
        <key>CFBundleURLSchemes</key>
        <array>
            <string>awesomescheme</string>
            <string>tamarin</string>
        </array>
    </dict>
</array>

Then override OpenUrl in your AppDelegate.cs file:

public override bool OpenUrl(UIApplication app, NSUrl url, NSDictionary options)
{
    if (url.ToString().Contains("/my-pattern"))
    {
        NavigateToUrl(url.ToString());
        return true;
    }

    return base.OpenUrl(app, url, options);
}

New WiFi API in Android 11

|

Android 10 messed up royally with removing the API to add networks and connect to it on a users device. The API was removed and as an alternative they gave us:

  1. A suggestion API, which shows a low priority notification, suggesting to connect to a given network. This notification would need to be swiped down a couple of times to reveal the YES/NO options. Then the device might choose not to connect to it anyways.
  2. A way to connect to a local network, not providing any Internet connectivity, through a System dialog appearing in the App. This dialog took forever to find your network. However, this method was not very useful for anyone as no Internet on this connection.

The last alternative, but technically not a part of the API for connecting to WiFi, would be to show a settings panel, where the user could manually enter credentials for a WiFi network in the list.

New Android 11 API

Note: this code will throw a ActivityNotFoundException if run on older Android versions. Make sure to add some version checking.

I guess the folks at Google got a bit backlash or they somehow changed their mind. However, they’ve now added an Intent you can fire to add a Network on the device.

The code for this looks something like this:

var intent = new Intent(
    "android.settings.WIFI_ADD_NETWORKS");
var bundle = new Bundle();
bundle.PutParcelableArrayList(
    "android.provider.extra.WIFI_NETWORK_LIST",
    new List<IParcelable>
    {
        new WifiNetworkSuggestion.Builder()
            .SetSsid(ssid)
            .SetWpa2Passphrase(password)
            .Build()
    });

intent.PutExtras(bundle);

StartActivityForResult(intent, AddWifiSettingsRequestCode);

Note: AddWifiSettingsRequestCode is just an Integer you define.

Then in OnActivityResult you can figure out whether any network in the list you provided was added with:

if (requestCode == AddWifiSettingsRequestCode)
{
    if (data != null && data.HasExtra(
        "android.provider.extra.WIFI_NETWORK_RESULT_LIST"))
    {
        var extras =
            data.GetIntegerArrayListExtra(
                "android.provider.extra.WIFI_NETWORK_RESULT_LIST")
                ?.Select(i => i.IntValue()).ToArray() ?? new int[0];

        if (extras.Length > 0)
        {
            var ok = extras
                .Select(GetResultFromCode)
                .All(r => r == Result.Ok);
            // if ok is true, BINGO!
            return;
        }
    }
}

The extras will return a list of Result which indicate whether they were added if it is Result.OK or not if it is Result.Cancel.

GetResultFromCode, simply parses the integers returned and turns them into a Result:

private static Result GetResultFromCode(int code) =>
    code switch
    {
        0 => Result.Ok, // newly added
        2 => Result.Ok, // wifi already there
        _ => Result.Canceled
    };

Running this code will show you a dialog looking something like this

Screenshot of Save this network dialog

Note: This code works and runs fine on a Google Pixel 3a XL running latest Android 11. However, on my OnePlus 8 running OP8_O2_BETA_3 opening the intent fails, because of OnePlus’s Settings App does not implement the AppCompat theme, crashing. I’ve reported this issue to OnePlus but never heard back from them.

You can check out the code from my Android 11 WiFi Repository on GitHub and have a go testing it yourself.

Old MvvmCross versions and Android 10 Play Store requirement

|

If you are looking for samples scroll down to the bottom of this blog post

I have gotten questions from multiple people, about versions of MvvmCross prior to version 6.4.1. What they can do about being forced to target Android 10, API 29, or newer from November 2nd, when Google stops accepting updates to Apps targeting lower API levels.

MvvmCross 6.4.1 introduced some changes to MvxLayoutInflater that are needed in order for it to work with Android 10. However, these changes are for obvious reasons not part of previous releases.

Luckily MvvmCross is written in a way where you can replace parts of it through virtual methods and implementing certain interfaces. This can be used to retrofit old versions of MvvmCross with newer patched versions of, in this case, MvxLayoutInflater.

You simply have to follow these 3 simple steps!

  1. Go to the corner
  2. Curl up in a ball
  3. Cry 😭

Sorry, wait, no. Thats not it! Upgrade MvvmCross! But, if you really cannot upgrade then try these steps.

  1. Grab latest MvxLayoutInflater
  2. Create your own implementation of MvxContextWrapper which uses 1.
  3. Create your own MvxActivity derivatives that uses ContextWrapper from 2.
  4. Replace all MvxActivities with your own

OK, I lied that was 4 steps. You might also need a 5th step, where you target Android 10 in your App, otherwise all this work will be useless anyways…

Lets go through all steps.

1. Get latest MvxLayoutInflater

Grab latest MvxLayoutInflater and MvxLayoutInflaterCompat, change namespace to something more suitable in your App. Rename the class FixedLayoutInflater or whatever you prefer.

2. Create your own implementation of MvxContextWrapper

We have to supply our own MvxContextWrapper class, the code in there is super simple. It just tells Android which LayoutInflater to use. We want to use our FixedLayoutInflater in there.

using System;
using Android.Content;
using Android.Runtime;
using Android.Views;
using MvvmCross.Binding.BindingContext;
using Object = Java.Lang.Object;

namespace Awesome.App
{
    [Register("awesome.app.FixedContextWrapper")]
    public class FixedContextWrapper : ContextWrapper
    {
        private LayoutInflater _inflater;
        private readonly IMvxBindingContextOwner _bindingContextOwner;

        public static ContextWrapper Wrap(Context @base, IMvxBindingContextOwner bindingContextOwner)
        {
            return new FixedContextWrapper(@base, bindingContextOwner);
        }

        protected FixedContextWrapper(Context context, IMvxBindingContextOwner bindingContextOwner)
            : base(context)
        {
            if (bindingContextOwner == null)
                throw new InvalidOperationException("Wrapper can only be set on IMvxBindingContextOwner");

            _bindingContextOwner = bindingContextOwner;
        }

        public override Object GetSystemService(string name)
        {
            if (string.Equals(name, LayoutInflaterService, StringComparison.InvariantCulture))
            {
                return _inflater ??=
                    new FixedLayoutInflater(LayoutInflater.From(BaseContext), this, null, false);
            }

            return base.GetSystemService(name);
        }
    }
}

3. Create your own MvxActivity derivate

Next step is to create your own MvxActivity derivate. Why? Because you need to supply that ContextWrapper we just created. If you were to simply inherit from MvxActivity and override OnAttachContext, which is where we supply the ContextWrapper, then it would still use the original MvxContextWrapper, since the only way to supply it is by calling base.OnAttachContext.

OK. So yank whatever MvxActivity type you are re-implementing. Here is a non-exhaustive list of types we had.

MvvmCross Version Type
4.4.0 MvxActivity
4.4.0 MvxAppCompatActivity
5.7.0 MvxActivity
5.7.0 MvxAppCompatActivity

The part to replace is the contents of OnAttachContext which should look something like:

protected override void AttachBaseContext(Context @base)
{
    if (this is IMvxAndroidSplashScreenActivity)
    {
        // Do not attach our inflater to splash screens.
        base.AttachBaseContext(@base);
        return;
    }
    base.AttachBaseContext(FixedContextWrapper.Wrap(@base, this));
}

With that done, now you just have to replace every inheritance from MvxActivity in your App with this implementation, except for any splash screens, not needed there.

You may have to think a bit here and modify the code to your needs, but these are the simplest steps I could come up with.

You can find sample projects with fixes implemented on my GitHub in the repository OldMvvmCross-Android10