Improving layout performance on Android

|
I've been working on improving performance of some of my Xamarin Android apps recently. One of the things I've been hunting down and improving on is GPU overdraw. What this means is how many times the same pixels on the screen are drawn per frame. Minimising this improves drawing performance on Android and in the end means smoother scrolling, faster drawing of views and generally makes your app perform more smoothly. The other thing is to hunt down nested layouts and flatten them to improve performance of the view laying itself out on the screen.

Now there are actually quite a lot of things you can do to your app to improve on, to reduce GPU overdraw and how long it takes to layout your views. I will try to cover some of them in this blog post.

Flattening your Layouts

In order to improve how fast your views are laid out on the screen on the device, you can do a very important thing. Flattening your layout. What does this mean? Let me show you an example!

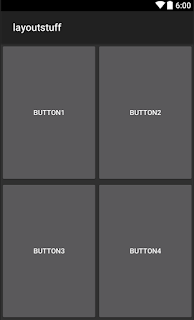
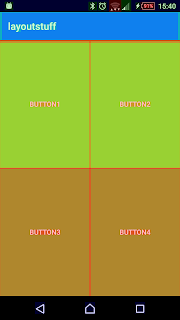
Consider the following page layout, which is very much made out of nested LinearLayouts.


The problem with the nested layout above is the amount of measure passes which has to be done in order to lay it out. For each child with a layout_weight tag, it needs to measure itself twice. Other layouts need to measure themselves too. Imagine having a more complex layout, with a lot of nesting; would resolve in excessive measure passes and make displaying of your layout slow. Especially in cases where you use the layout is used as a row layout. This would hit the app performance quite a lot and there would be noticeable slowdowns in your app.
The layout above, can be flattened using RelativeLayout. You will notice, that layout_weight is quite powerful for layout out equal sized views, so some tricks have to be used to achieve the same with a RelativeLayout. The performance in the end is much better though.


As you see. The above layout employs two additional layouts, which are used to center the other views. An alternative to RelativeLayout to make percentage sized views is PercentRelativeLayout from the Android.Support.Percent package. With it you can set aspect ratios, use percents for widths and heights and more. I would recommend keeping your layouts as simple as possible.

If you simply wish to stack views on top of each other, you can use FrameLayout, which is a real good performer as well.

You can read more about optimizing layouts in the official Android documentation, which also shows how to use the Hierarchy viewer to inspect slow layouts.

GPU Overdraw

GPU overdraw is another problem you may encounter. What is this overdraw? It tells us about how many times the same pixel gets drawn on during a frame. Why is this bad? The more times the same pixels get drawn on, there more time we are wasting. In order to get fluid animations and scrolling etc. you need to have as high a frame rate as possible. A good goal is to try to hit 60 FPS (Frames Per Second) all the time. In order to do this, we need to spend as little as possible time drawing a frame and below 16ms. That is not a long time! Let's explore some things you can do as a developer to improve on this.

Enable showing GPU overdraw

You can enable an overlay on your device or emulator, which will show you the GPU overdraw done by your app. You can find it in developer settings.

 This will give you a funny looking screen with colors laid on top of it. Now these colors actually mean something.
Overdraw chart from Android Documentation
The purple-ish blue means pixels have been over drawn once, green means twice, light red means thrice and dark red 4 times or more. You will also see stuff showing in its original color, this means that the pixels have not been overdrawn. The aim is to have no overdraw at all. However, this can be very hard to accomplish, unless you just have a background drawn on the screen.

Removing backgrounds from views

 A simple thing to reduce overdraw is to just remove backgrounds from views. Let us consider the first layout I showed you, now with everything having a background.

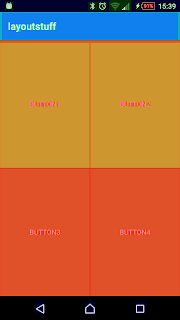
This will gives us this when showing it with GPU overdraw debugging enabled.

Our layout is RED just because we added backgrounds to our layouts. Removing these backgrounds reduce overdraw significantly and in turn improves performance of your app.

Just removing the outermost background reduces overdraw and in this layout the change won't be visible anyways.
The two nested LinearLayouts use the same color, what if we use that as our theme background and remove the color from the layouts?
Again less overdraw. Here is the view without GPU overdraw enabled.
In this case, since the buttons themselves have a background, there will be some overdraw and that can we sometimes cannot do anything to prevent. However, simply reducing a layout from being red all over to green or light blue, means a lot towards performance. Especially in cases where the layout is used in a ListView or RecyclerView or similar Adapter type of view as less time is used to draw the row.

Hence, try to avoid using backgrounds, especially if you can't see them at all. Also a good idea is instead of adding a background to each layout, add that background to your theme, which is pretty simple.

You can also opt to actively remove backgrounds from views with android:background:"@null" for views you don't really care about their background.

As for shadows, borders and the like, which you could do as a background. If you really have to have them use 9-patches with transparency in the areas you don't show anyways. Android will optimize the drawing of these for you and will not overdraw here.

Reducing overdraw in custom views

You might have views that override the OnDraw method where you draw stuff to the Canvas it provides. Here overdraw matters as well. Using OnDraw is what normal views essentially end up using in the end when they draw them selves on the screen. So you have to be careful here as well.

One way to eliminate all overdraw is to draw to a Bitmap first and then draw that to the canvas. This is normally know as double buffering. Be careful with using this, it gives the overhead of first drawing to the Bitmap then to the canvas which draws it to the screen.


The above code shows a simplified version of it. It does indeed result in just 1x overdraw if draw on a background. However, if your draw code is slow, you may encounter flickering if you need to redraw your view a lot.
SurfaceView in Android does it a bit differently. It does all the buffered drawing on a separate thread. You could do this as well. Then call Invalidate() or PostInvalidate() when you need the buffer to be shown on the screen

The technique I ended up using is a modified version, where I delay the drawing until everything is drawn on the Bitmap. Then I signal with PostInvalidate(). It looks something like this the code below.


Now this could probably made a bit simpler. However, what I achieve with this is, whenever I manually signal with Refresh() I cancel any current drawing operations to the buffer as I am not interested in what it provides as it is old data... PostInvalidate() triggers the OnDraw method whenever the GPU is ready. In here I kick off a new Task which draws to the buffer. When that Task is done it calls PostInvalidate() to signal that the buffer has changed and that will be drawn. It is a variation of double buffering, which allows draw operations to take a long time. This has resulted in smooth scrolling of the RecyclerView I am using with these graphs as rows and no overdraw.

Maybe you can use some of these techniques in your app. Let me know what you find out in your application.
In general you want to
  • Flatten your layouts to reduce measure calls
    • Use RelativeLayout instead of LinearLayout with weights
    • Even better FrameLayout for stacked views
  • Remove backgrounds that are not shown anyways
    • Use theme background where applicable
    • android:background:"@null"
  • Use 9-patch for borders and shadows
  • Reduce overdraw in your own OnDraw calls

Resources

https://medium.com/@elifbon/android-application-performance-step-1-rendering-ba820653ad3
https://www.hackerearth.com/practice/notes/rendering-performance-in-android-overdraw/
http://www.xenomachina.com/2011/05/androids-2d-canvas-rendering-pipeline.html
http://developer.android.com/tools/performance/debug-gpu-overdraw/index.html
http://developer.android.com/reference/android/graphics/Canvas.html
https://www.udacity.com/course/android-performance--ud825


Installing gapps in Visual Studio Android Emulator (Marshmallow)

|
29/5/2017: Visual Studio Android Emulator has been discontinued. Microsoft recommends using the Emulator Images that Google provides. The Google images rely on HAXM as described below, so no AMD support and you can't run it with Hyper-V running at the same time.

The images Google provides in the Android SDK are all great and work fine if you have Intel HAXM installed on the machine. However, a lot of developers using Visual Studio, also use Hyper-V to run Windows device emulators. This means Intel HAXM doesn't work and in turn means that the x86 images from Google won't run because there is another hypervisor running.

Microsoft have been so kind to provide the Visual Studio Android Emulator which uses Hyper-V as hypervisor and does not require you to reboot your machine every time you want to switch between using Hyper-V and another hypervisor. Great!

There is one caveat. None of the images included in the Visual Studio Android Emulator tools have Google Play Services installed. Hence, you have to install them yourself. It turned out to be more complicated than I thought it would. Hence, I am documenting it in this blog post.

At first I tried the tried and great OpenGapps, which a lot of custom roms for Android devices recommend using. Picked x86 and the pico package for Android M and tried to install that on a Marshmallow image. It just threw an error telling me that the system/ folder was missing in the zip. Great, what then? I tried adding that folder with an empty file manually to the zip, as it seems it doesn't care whether the zip is signed or not when installing. This made the zip install. Well not really, no Play Store or Play Services where actually installed.

I tried some other GAPPS zips from various sources, none of them seemed to work. I searched around without finding any solution.

Alexandre Chohfi over at the Xamarin Community Slack pointed out that he had the same issues with Genymotion, which runs on VirtualBox and pointed me in the direction of this gist explaining how to do it on Genymotion. Following the instructions from arcao in the comments works! Without installing that Genymotion ARM translation package too.

Steps I used

Prerequisites

1. Install a Marshmallow image in the Visual Studio Emulator for Android tools (can be opened through Tools > Visual Studio Emulator for Android in Visual Studio)


2. Download gapps-L-4-21-15.zip

3. Download benzo-gapps-M-20151011-signed-chroma-r3.zip

Installing

1. Start the Marshmallow image

2. Drag the gapps-L-4-21-15.zip onto the Emulator after it has booted. It will prompt you to install the zip and shutdown the device after that.


3. After having install the gapps boot up your Emulator again, it will show a dialog about optimizing newly installed packages.

4. Go to Settings > Accounts and Add a Google Account. Ignore all crashes.


5. After adding the Account, install the benzo-gapps-M-20151011-signed-chroma-r3.zip by dragging it onto your Emulator, like in step 2.

6. After rebooting after step 5. is done, you should now have working Play Services and Play Store on your Visual Studio Emulator for Android.


Using RESX files in PCL for Xamarin and Windows projects

|
I've been working on a project which is targeted for Xamarin.Android, Xamarin.iOS and Windows 8.1 (non-Silverlight). They are all sharing the same PCL projects for ViewModels, Services etc. Hence, I thought this was an ideal place to chuck in application strings. Don't get me wrong, it still is! However, there are some things you need to know in order to get it to work nicely with the Windows 8.1 project.

Windows 8 introduced new RESW files, which structurally are similar to RESX files. However, instead of needing to have all sorts of helpers etc. to bind localized text strings and now dimensions etc. to properties of FrameworkElements, that is now done by convention. Which is really neat. However, this is of course only for Windows 8.
How this looks in practice is that your key for some resource could be something like: Welcome.Text and the value could be something like Hello, World!
In your XAML file you could then have something like <TextBlock x:Uid="Welcome" Text="Design Time Text" /> and then the Text property would automatically be set to the one in the RESW file. Neat!

Now all this RESW stuff is cool and all. However, if you are either too lazy to migrate to RESW or if you want to use RESX files because they work nicely with Xamarin projects then it is not all that nice in the Windows 8 world.

In Debug using the RESX approach, it switched automagically to the correct language. However, as many other posts around the Internet described, this was not the case on a device when having created a Store package. It would always default to the neutral or default language.

Several sources say this blog post is the solution to the problem in my case nothing actually happened. It describes how to use your own implementation of ResourceManager and having a break-point in the GetString method I saw the CultureInfo always was null. However, the Default one was actually correct. Nevertheless the incorrect language was taken from my RESX files when deploying a Store package.

After having spent way too much time on figuring this issue out I fell over this blog post, which points out a key to still be able to use RESX files in a Windows 8.1 project and Xamarin projects at the same time with it being shared in a PCL.

The steps are quite simple.


  1. In the PCL where you have your RESX file(s) add the following to the csproj file: <SupportedCultures></SupportedCultures> this should simply contain the language codes semi-colon separated like so: <SupportedCultures>en;da;de</SupportedCultures>
  2. In your Windows 8.1 project. Create a strings folder with each of the supported language codes as subfolders.
  3. Create a RESW file in each of those language code subfolders.
The result should look something like

That is it. Now your Windows 8.1 project should be able to pick up all the languages you have specified and you can get the correct strings from your RESX files.


Here is how I use it.

In my PCL I have a small helper for Windows 8.1 which looks like:

I have registered that helper in my App.xaml file like so:

Then I can use it like this in my Windows 8.1 app XAML pages and templates:


Given that Welcome is a key in the RESX files.


On iOS I create my views in C# code pretty much by hand. Hence I simply use the RESX files directly. So if we say my RESX file is called ApplicationStrings.resx then usage looks like:


On Android I use RESX localization plugin for MvvmCross, where Stefan Schoeb has a very nice description on how to use it. I don't use it for iOS since it is just easier to directly get the strings. Less code 😁

New MvvmCross plugin + new iOS view ports

|
It has been a busy couple of weeks and the result of this is now available to all of you.

ALRadialMenu

Last week I released a new NuGet package called ALRadialMenu, which is a port from Swift to C# of Alex Littlejohn's ALRadialMenu. It is simply a menu which spawns N amounts of UIButton's in a circle around the point you want it to. It is highly configurable.


You can find the source code and instructions in the GitHub repository.

SGTabbedPager

I also released a new NuGet package called SGTabbedPager, which is mimicking a ViewPager and ViewPagerIndicator on iOS. This is a port from Swift to C# as well.


Source code and instructions are on GitHub

DeviceInfo MvvmCross plugin

This week I created a Device Information plugin for MvvmCross. I know there are some other plugins. However, not all of them covered exactly what I needed. The plan is to expand it with more device information, such as batter, storage, connectivity etc. Ideas are welcome and can be submitted as a GitHub issue on the repository.

This plugin can be found on NuGet too as Cheesebaron.MvxPlugins.DeviceInfo and targets Android, iOS and Windows 8 + Windows Phone 8.1 (universal). It should also work in the new Windows 10 UWP apps, although not tested.

Removing shadow from NavigationBar and TabBar on iOS

|
I am making an app where I don't want to display the shadow underneath the NavigationBar and the top gradient on a TabBar.

For some reason the Apple SDK does not provide a simple boolean Property where you can just disable it. A lot of solutions on StackOverflow requires you to set a background image and a shadow image to remove it entirely.

Digging through solutions a bit I found that these two ways seem to work pretty well.

So for the NavigationBar, what you do is traverse through all subviews to find the UIImageView which is the shadow and simple remove that from showing up. This is done as follows.


For the TabBar it is slightly different. It has a member variable, which is private, so you cannot get hold of it directly. However, using the SetValueForKey() method, which all NSObject's have, you can set that variable to true.

See the difference?